How to Create a Price Calculator for Website
The major problem with websites providing any service is that price estimation is complicated.
The pricing table usually makes things slightly better, but users need to calculate prices manually based on their needs, and they will most likely get it wrong.
Creating a price calculator for your website can significantly enhance user experience by providing quick and transparent cost estimates. A well-designed price calculator boosts customer confidence and can drive higher conversion rates.
You don’t need to be a coding expert to build your own price calculator. With the right tools and a step-by-step approach, you can seamlessly integrate an interactive calculator that meets your business needs.
This guide will walk you through the process, ensuring you can easily add this valuable feature to your site.
Best part? You can do it for free.
Types of Price Calculators You Can Create
Price calculators can be tailored to meet different needs depending on what you are offering on your website. You can create tools that handle product pricing, service costs, or subscription-based models.
Product Pricing Calculator
A price calculator helps customers calculate the total cost of the items they wish to purchase. It typically includes fields for selecting product options, quantities, and potentially discount codes. This type of calculator is essential for e-commerce sites where users buy physical goods.
The necessary calculator fields to consider:
- Input Fields: Users can input different quantities and select from product variations.
- Tax and Shipping: Automatically calculate these based on user location.
- Discounts: Include promotions or seasonal discounts.
Service Cost Estimator
A service cost calculator is helpful for businesses offering professional services like consulting, repair, or design. This tool provides an estimate based on various parameters, such as the hours needed, the complexity of the job, and other custom requirements.
Key fields to include:
- Hourly Rates: Users should be able to enter the expected service hours.
- Custom Requirements: Input fields for additional needs or complexities.
- Location Adjustments: Adjust pricing based on customer location if applicable.
Here is an example of such a service calculator. It estimates the price of tiling based on the size of the tiling area and the cost of the tiling.
Subscription-Based Pricing Calculator
A subscription-based pricing calculator is designed for services or products offered repeatedly, such as software, memberships, or streaming services. This calculator considers factors like the length of the subscription, the number of users, and tier levels.
Important fields:
- Subscription Tiers: Different pricing based on service tiers.
- User Quantity: Adjust pricing based on the number of users or volume.
- Billing Cycle: Options for monthly, quarterly, or annual billing.
Each type of calculator aims to improve user experience by offering precise cost estimations based on different factors specific to products, services, or subscriptions.
Step-by-Step Guide to Creating a Price Calculator
In this guide, I will build a website cost calculator for photography freelancers, but the principles are the same for any other industry.
I'll cover adding input fields, configuring custom pricing formulas, and setting up the submit button to finalize orders.
Creating a custom calculator for your photography services can save you valuable time answering questions and offer clients instant quotes.
Let's make it.
Login to Creative Widgets
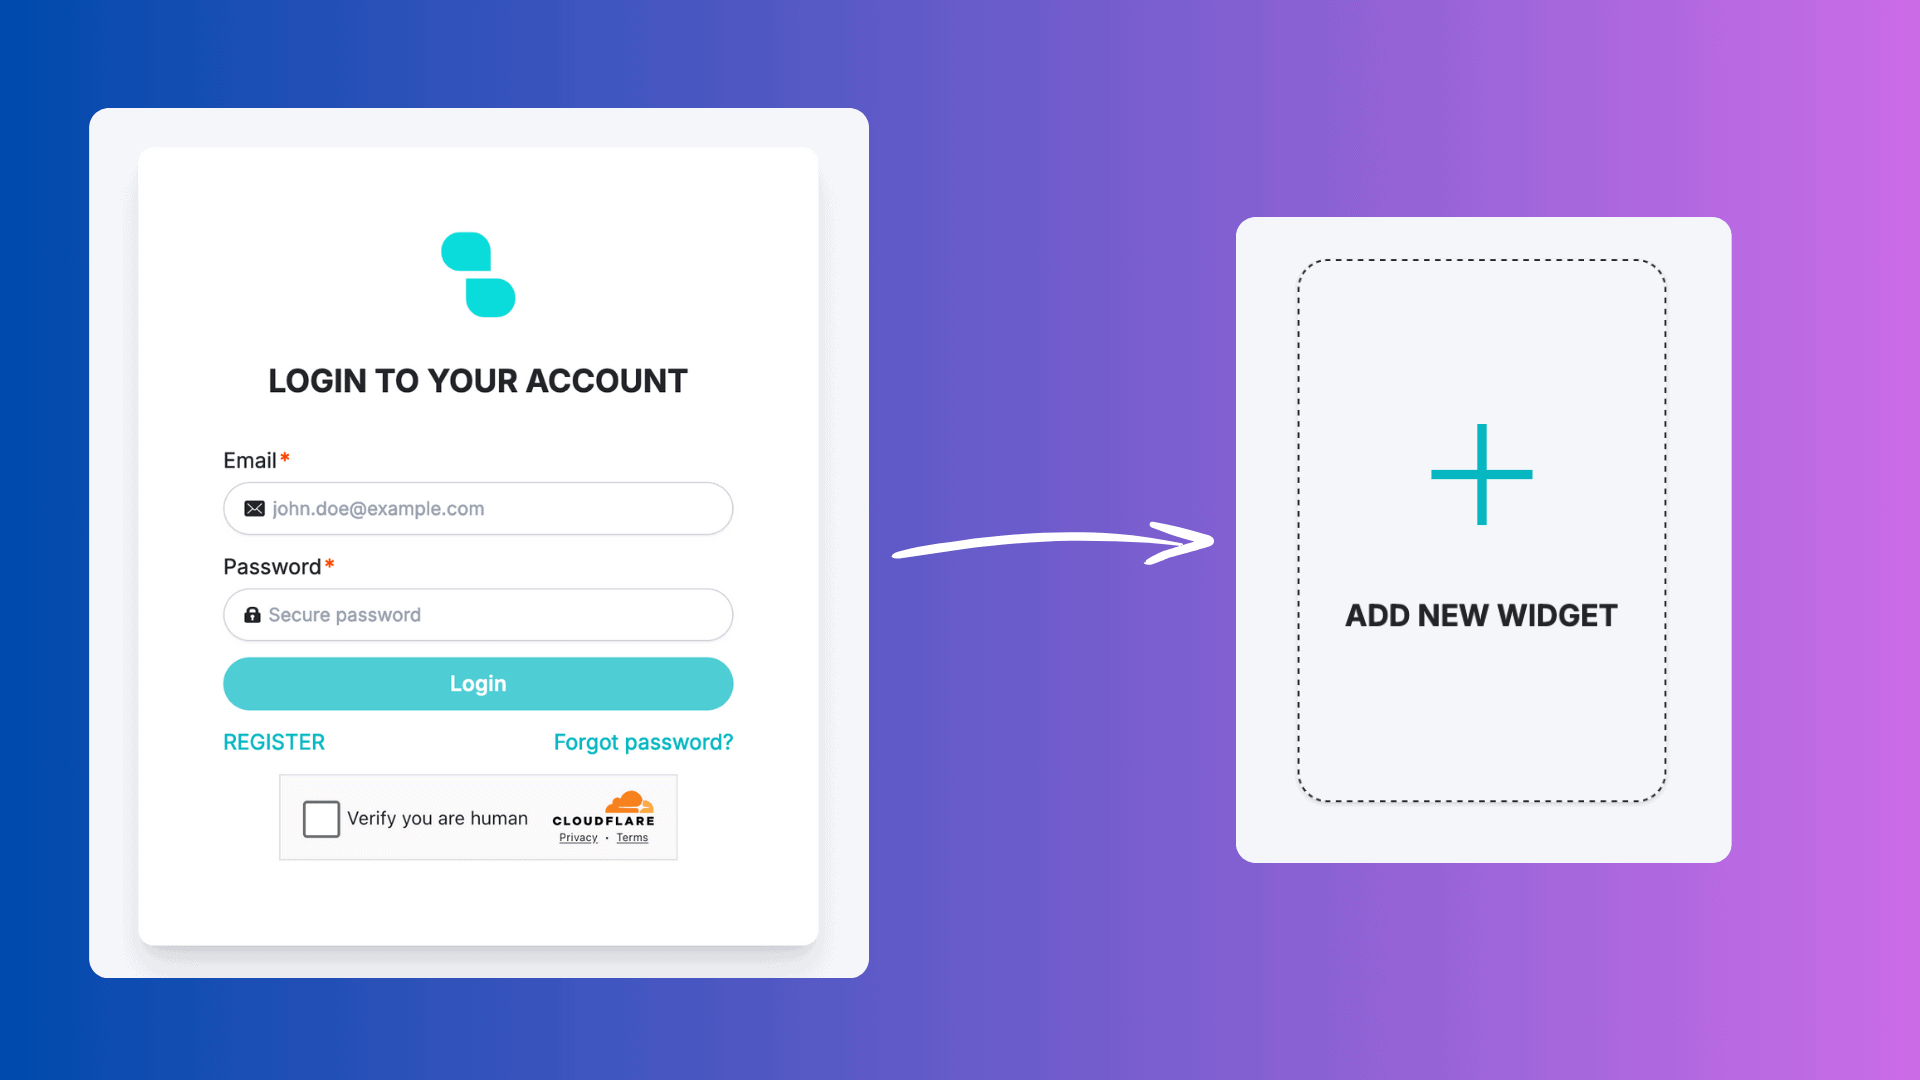
Log into the Creative Widgets calculator builder and press the Add New Widget button to create a new calculator.
Adding Input Fields
Start by outlining the variables that influence your pricing. For a photography service, these might include:
- Occasion: Wedding, birthday, corporate event, etc.
- Number of Photos: Base packages and additional photo prices.
- Additional Video Service: Add-ons like video coverage.
- Extra Fee After 10 PM: Time-based surcharges.
- Storage Option: USB or Cloud storage.
Now that you have chosen base fields in our calculator add containers and fields.
Start by adding a field container; you can add fields to each container. For example, you can set up a container for the "Occasion" with a dropdown field listing various event types.
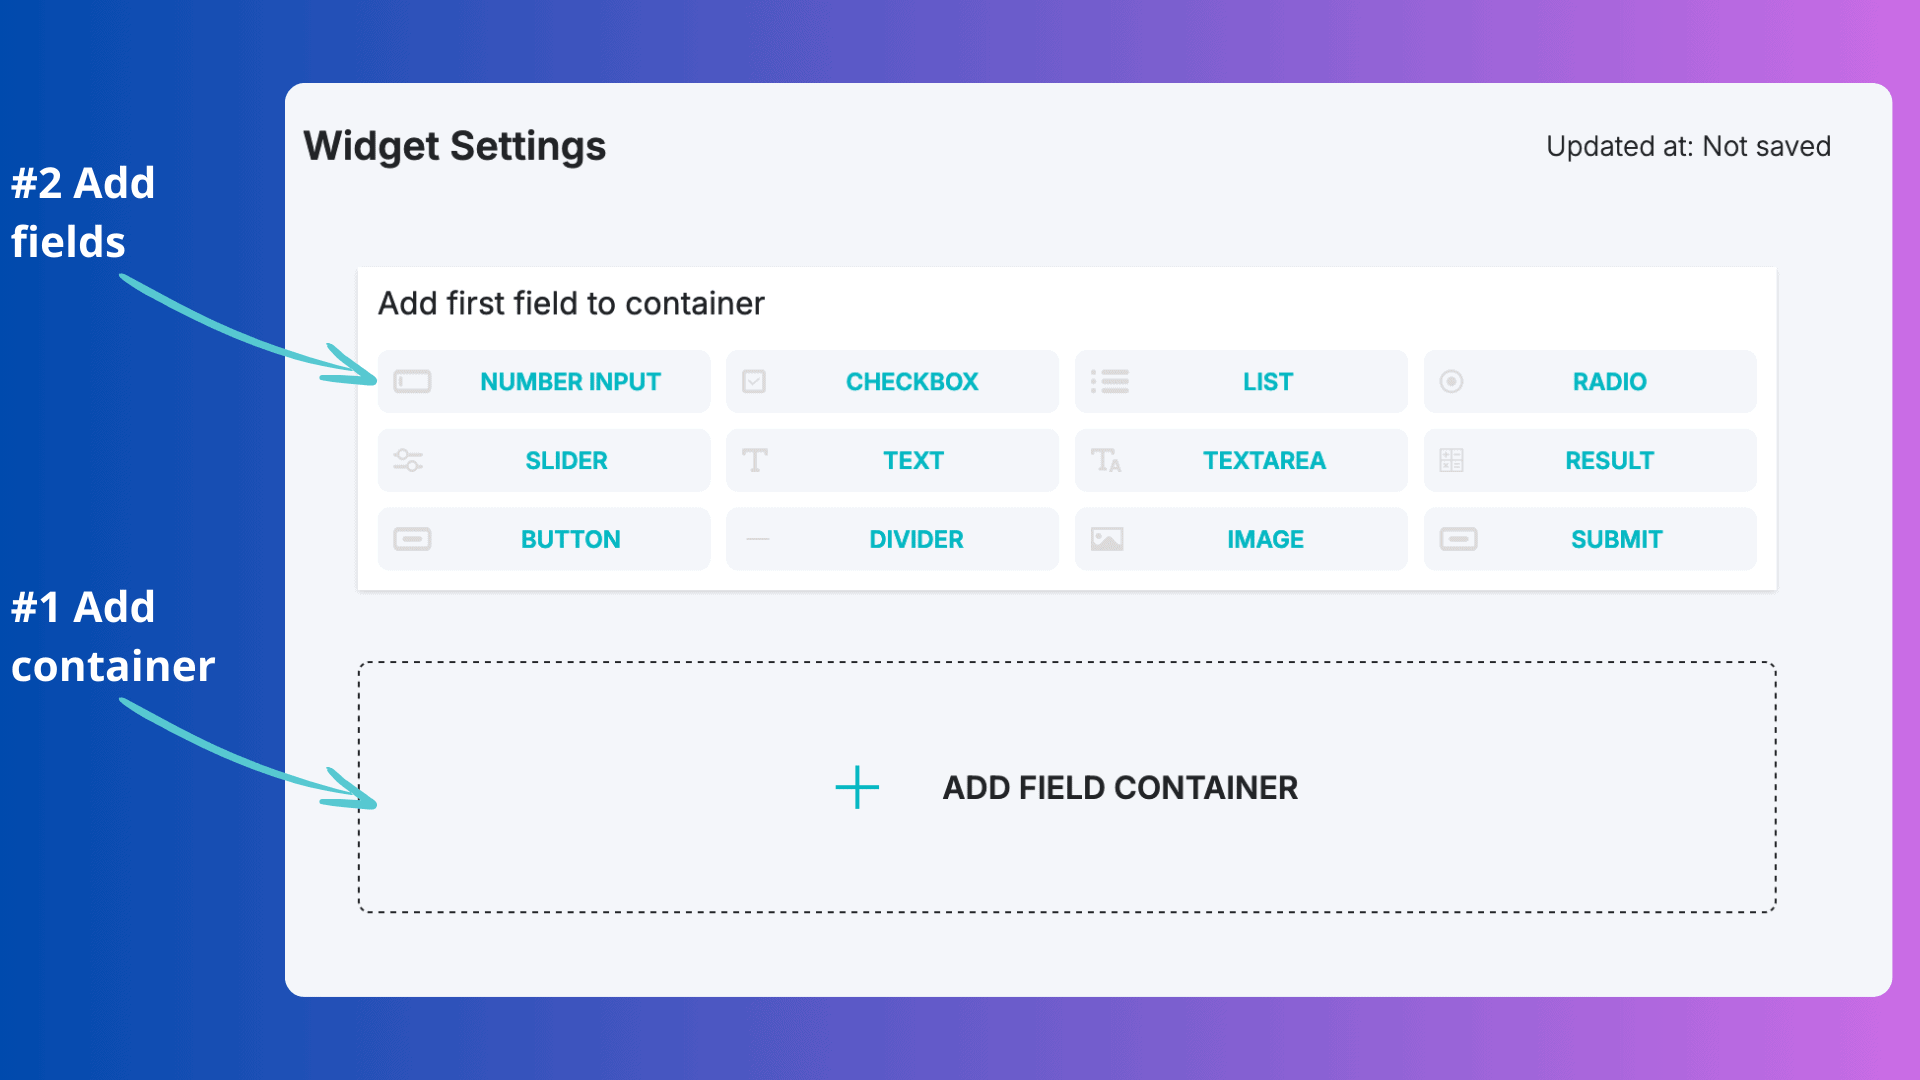
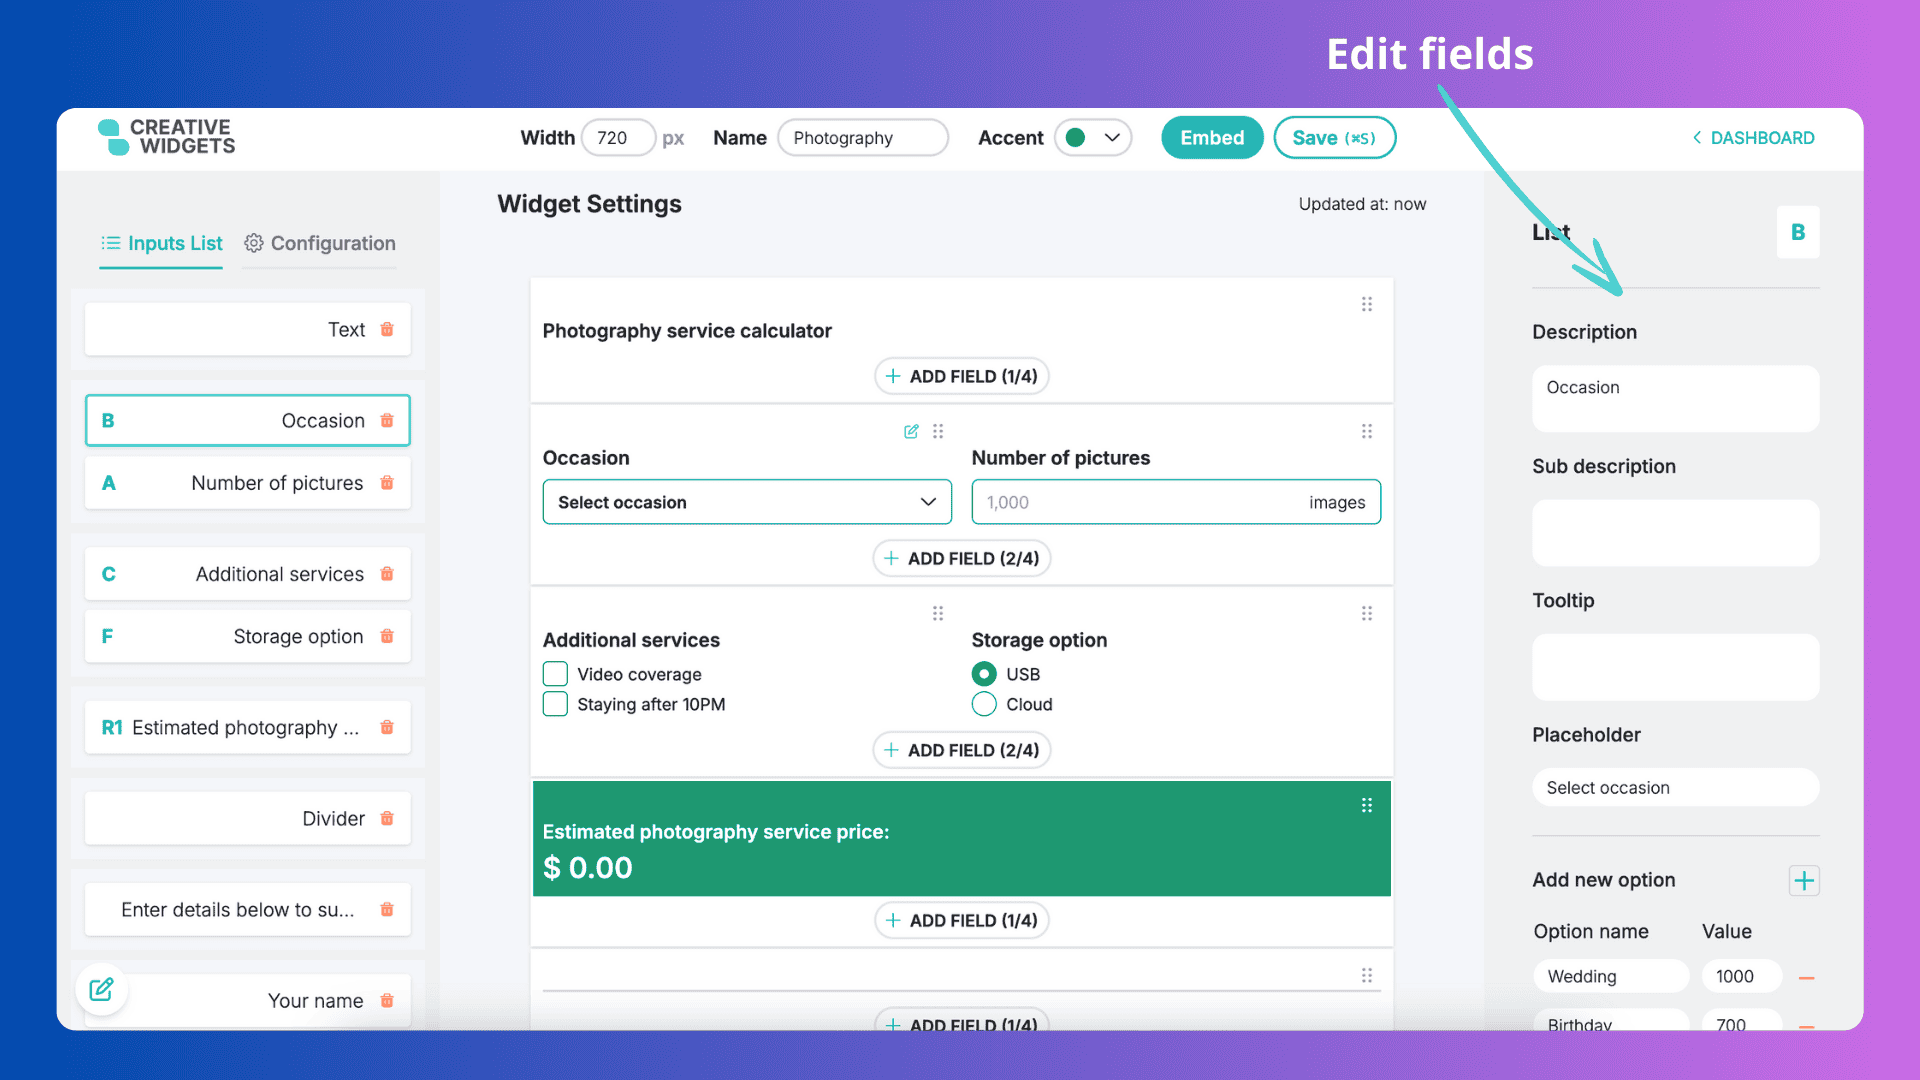
After adding all the fields, click on a field you want to select, and the configuration sidebar will open.
Use the sidebar to configure the field. Every field has different settings based on its type. I will add labels and options for each field of our future web calculator.
Add Custom Formulas for Accurate Pricing
Use a "Result" field with the custom formula to compute the total cost from the input fields.
Here’s the formula structure to get an instant quote:
- Base Price: Based on the occasion.
- Photos: Calculate by multiplying the number of photos by unit price.
- Video Service: Add a fixed cost if selected.
- After 10 PM Fee: Include an extra charge if the event ends after 10 PM.
- Storage: Factor in different rates for USB or cloud storage.
Total price formula:
Total Price = Occasion Price + (Number of Photos * Price per Photo) + Video Service Fee + After 10 PM Fee + Storage Fee
Every field that can be calculated has the letter ID assigned to it. Use this letter to reference the field's value as you write custom formulas.
Type the corresponding letters into the formula box.
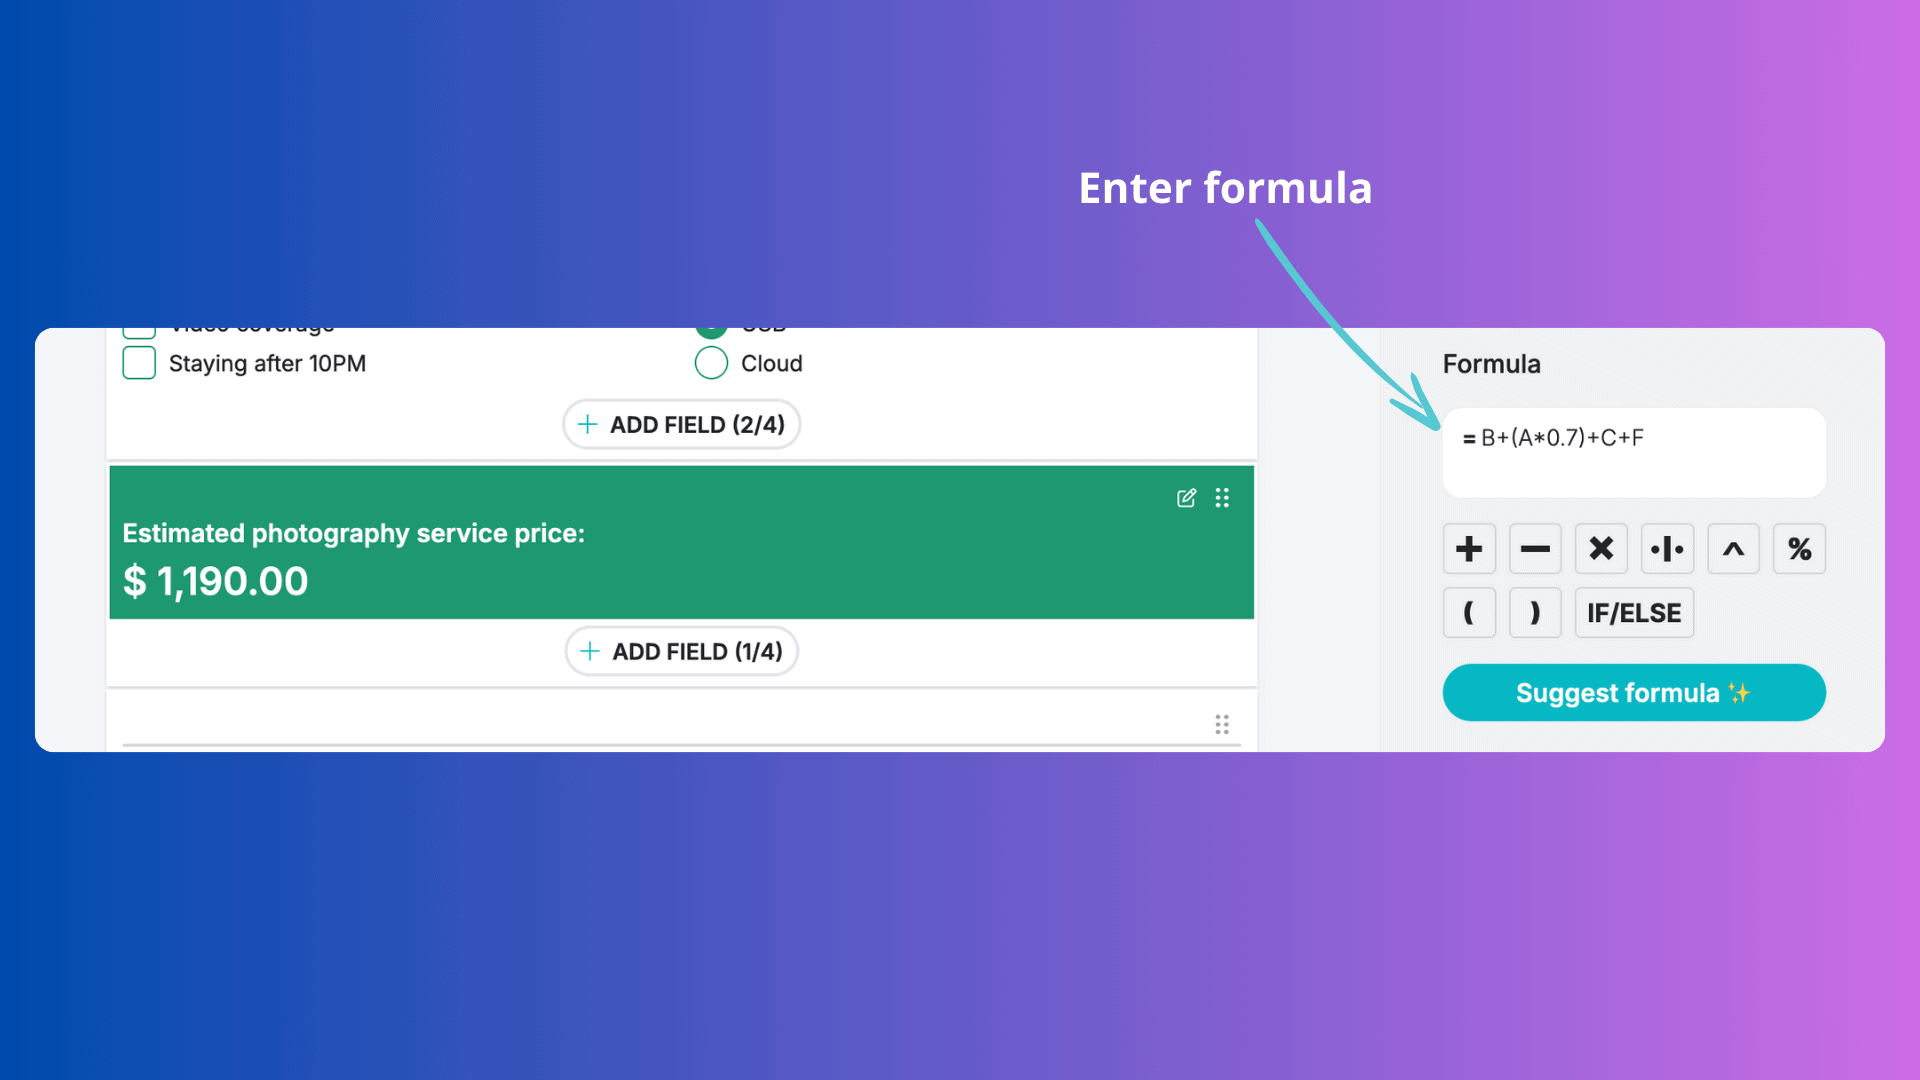
Once you finish the formula, validate the calculation results to ensure the quote provides the exact price you expect.
For simplicity, I am using a fixed price per photo here, but you can implement dynamic pricing. For example, if the user wants more than 1,000 photos, use $0.5 per photo as the base price; otherwise, use $0.7.
You can use the IF/ELSE button to create more complex formulas.
Adding Submit Button
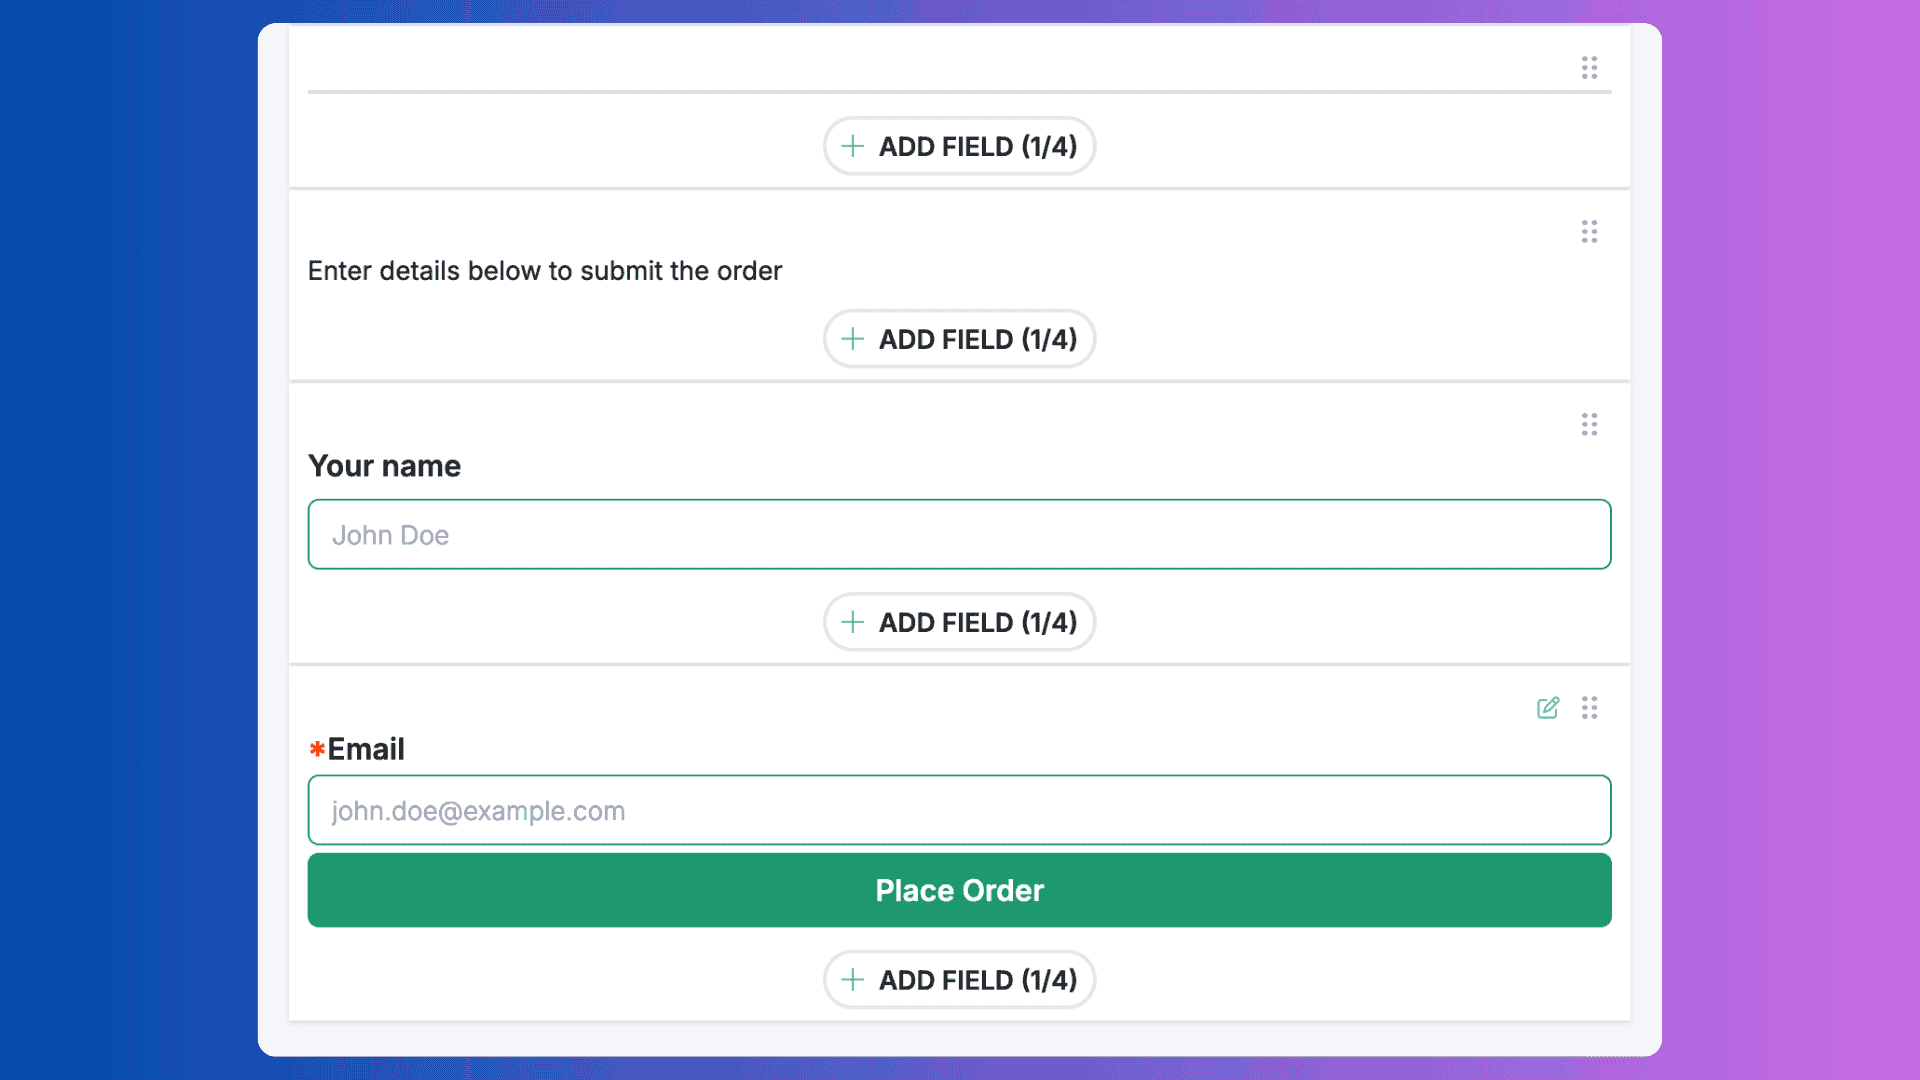
After configuring all fields and calculations, it's time to add the submit button. This will allow website visitors to finalize their quote requests.
The "Submit" field includes fields for capturing client details, such as email addresses. You can also let users select whether they want to receive a copy of the submitted web calculator.
This flag ensures users receive a custom quote email with all form fields and the final price if required.
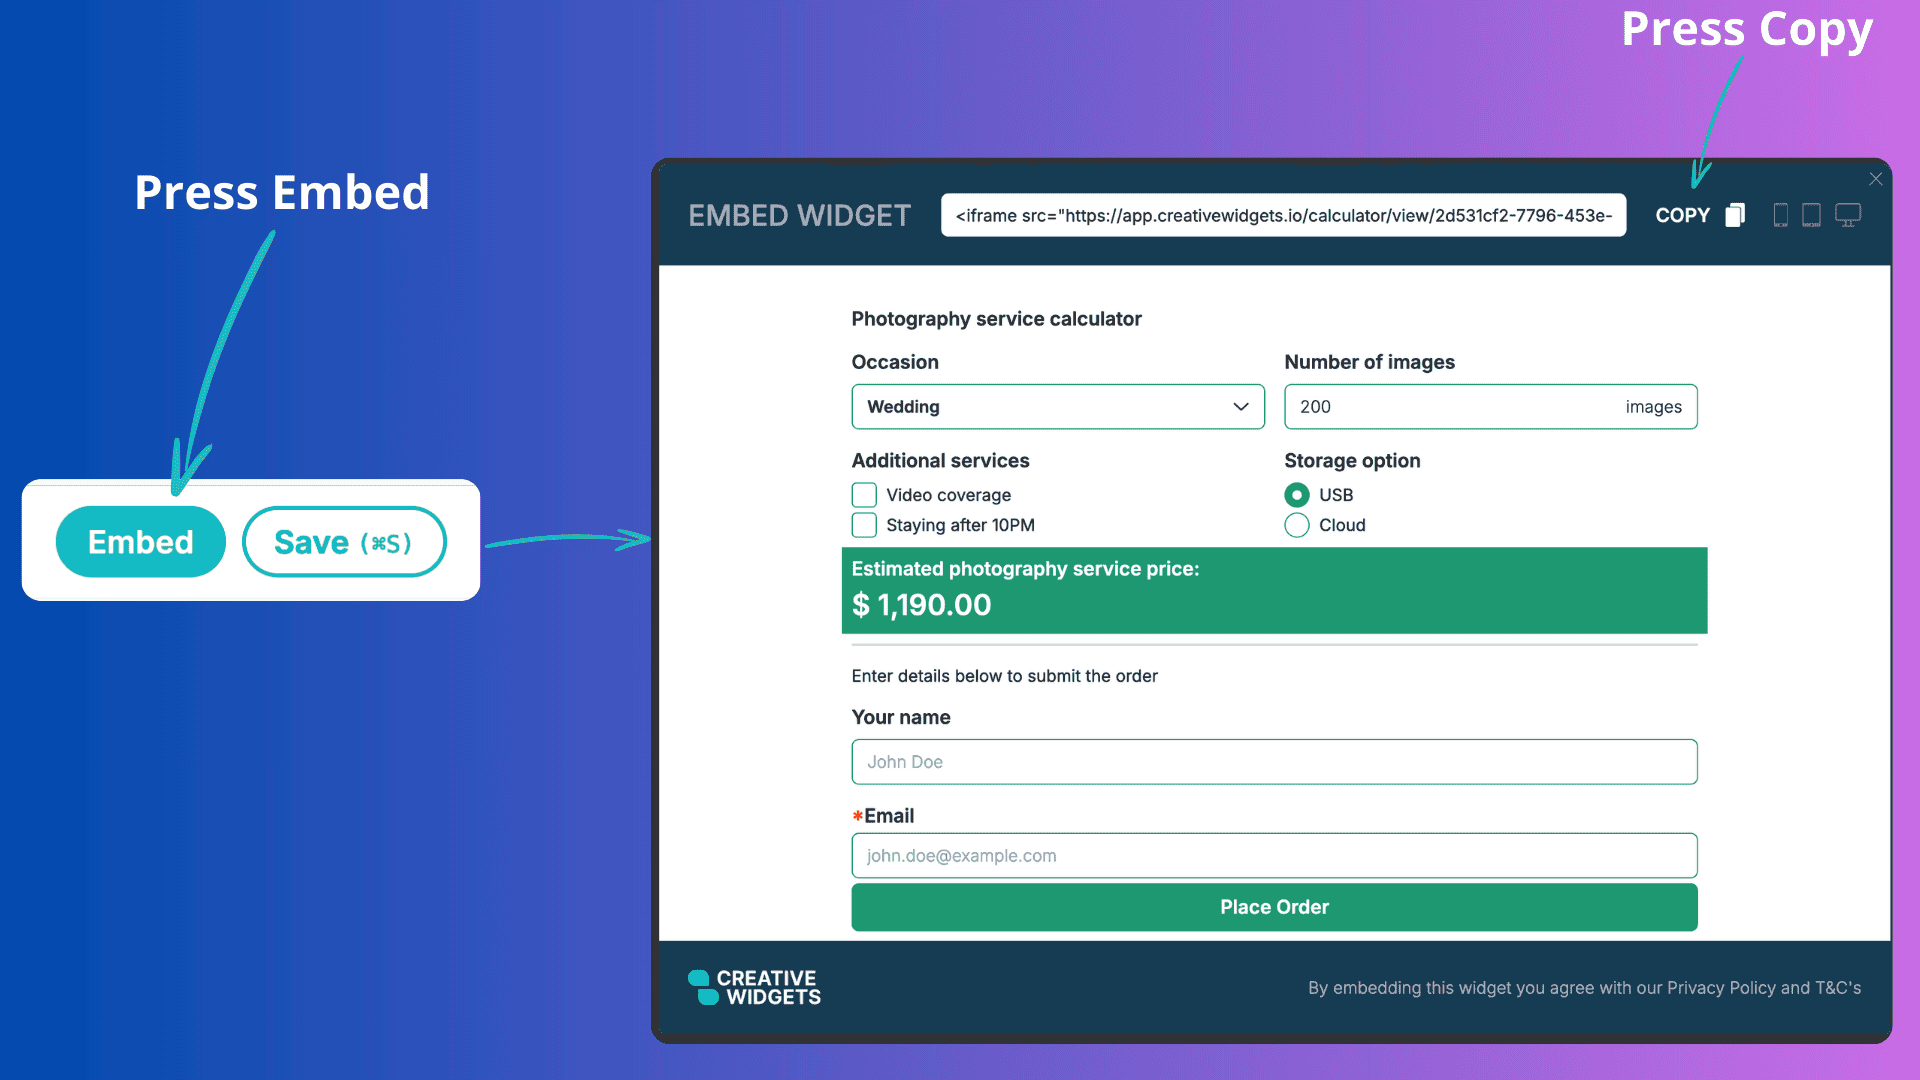
Here is a final preview of the price calculator we have built. You can play with theming config to match your web design.
Embedding and Testing Your Price Calculator
You'll need the embed code provided by Creative Widgets to embed your custom price calculator on your web page.
First, press the Embed and Copy buttons within the preview modal.
Next, open the HTML file of your website.
Decide where to place the calculator and paste the iframe code in that location.
If you have a WordPress site, follow my WordPress guide to embed custom calculators.
Save your HTML file.
Now, test the embedded calculator.
Open your website in a browser.
Navigate to the page containing the calculator.
Confirm the calculator displays correctly.
Interact with it to ensure it automatically calculates prices as expected.
You can check responsiveness on different devices by resizing your browser window or using developer tools. Also, remember to check that all automatically calculated results are correct.
If adjustments are needed, modify the online calculator in the Creative Widgets app.
Repeat the tests.
That's it! You've embedded and tested your own calculator.
Benefits of Using a Price Calculator
Using a price calculator on your website can lead to more engaged users, higher lead generation, and increased sales conversions.
Enhanced User Engagement
When you create a price calculator, you dramatically improve user interaction on your website. Customers can quickly determine how much a product or service costs, and they are more likely to stay on your site longer and explore additional offerings.
Calculators provide a personalized experience, showing users pricing based on their specific needs and preferences.
This customization keeps users interested and engaged, and an engaged user is more likely to return to your site, recommend it to others, and explore more pages.
Increased Lead Generation
Having a price calculator can also boost your lead-generation efforts. You capture valuable data when users input their information to receive a quote.
This data allows you to follow up with targeted marketing efforts, turning casual visitors into potential customers.
Say you are a mortgage broker. A mortgage calculator on your website can give you early data about what kind of property the visitor is looking at.
Price transparency builds trust, encouraging users to provide their contact information. Users are more inclined to share their email or contact details in exchange for upfront pricing.
This can significantly improve your ability to generate leads, providing more opportunities for future conversions.
Improved Sales Conversion
A price calculator can help streamline potential customers' decision-making process, making it easier for them to move from consideration to purchase.
When users see a clear price for what they want, it reduces uncertainty and can drive quicker buying decisions.
By providing immediate, transparent pricing, you eliminate one of the biggest barriers to purchasing. Customers appreciate knowing upfront what they'll pay, which makes them more likely to complete a purchase. This reduction in hesitation can lead to higher overall sales.
Final Words
Pricing calculators are a great way to make your existing page more engaging and get valuable insights from your visitors.
With Creative Widgets, you can easily create a pricing calculator in less than 10 minutes, and the best part is that you can start with a free price calculator.
Give our web calculator builder a try today.
